Report Designer Highlights
The Document Creator Report Designer includes the FastReport.Net User's Manual, which can be opened from the designer via Help > Help Contents. This manual is also available online.
In this section some of the most useful Document Creator Designer features will be highlighted. These are some of the features that are added by the Apportunix team to the designer to support even faster and more efficient layout development.
VisibleExpression Property
You can use the VisibleExpression property to specify a condition/expression of when a certain part/control of the layout (e.g., TextObject, Databand, PictureObject, etc.) should be visible.
In these expression you can also include columns from the report dataset.
To set up a VisibleExpression, please follow these steps:
- First, export the layout to a Document Creator Design File (.dcrd) file and open it in the Document Creator designer. See Export Design.
- In the designer, select the control (e.g., TextObject, Databand, PictureObject, ...) that you would like to show or hide conditionally.
-
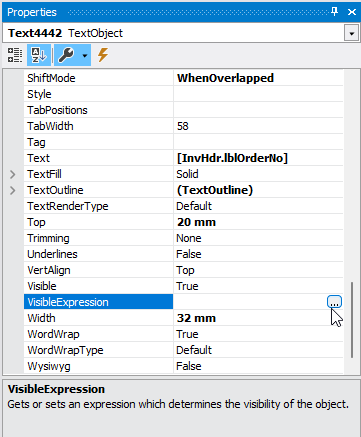
In the Properties tab/grid (on the bottom-right of the designer), scroll down to the
VisibleExpressionproperty and use the...button (drill-down) to open a text editor for the property. -
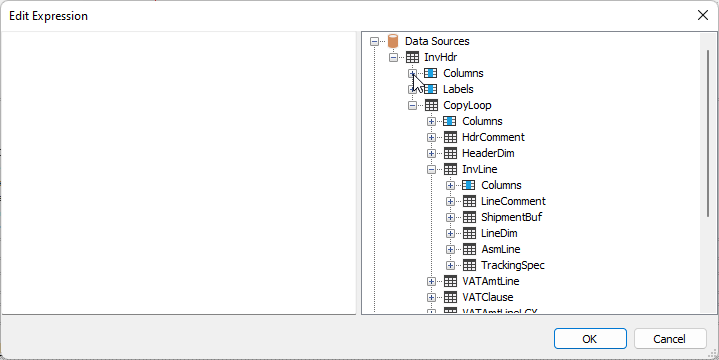
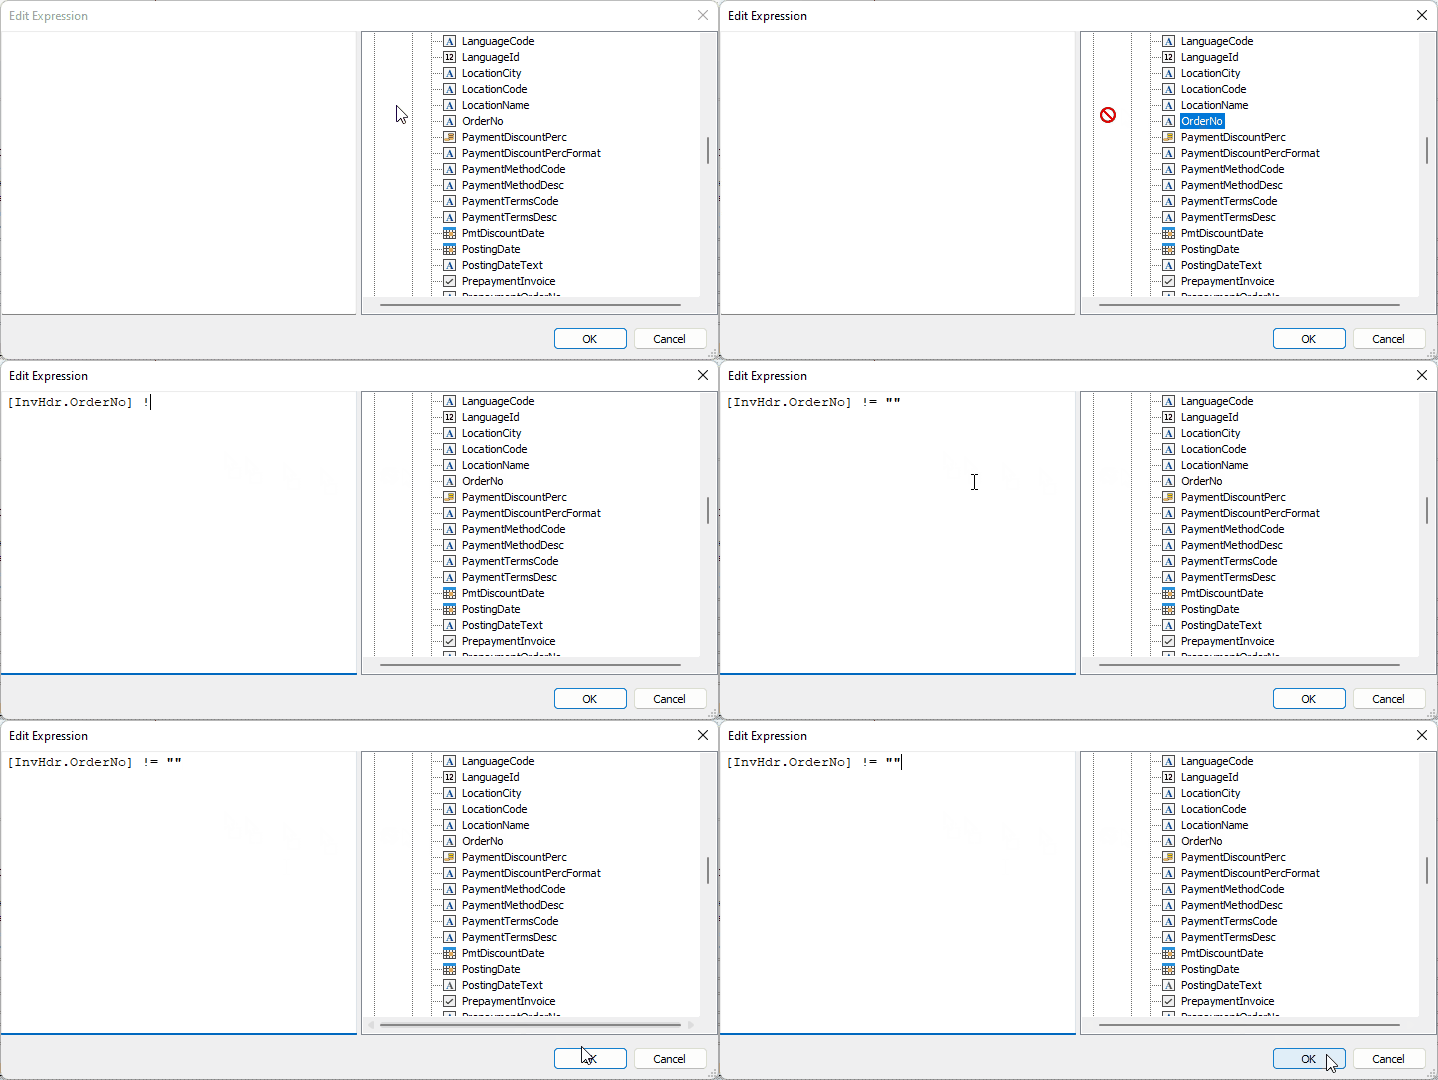
In the Edit expression window that opens you can include data columns in your expression by selecting them from the pane on the right and dragging them into the expression editor pane on the left. Please see the animation below for an example (where we set up a conditional expression which says "The part/control should be visible if the "Order No." is not empty.").
After completing your expression, close the editor by clicking on the OK button.
Tip
Please check our F.A.Q.-item: "What is the syntax we can use for expressions (e.g., for the VisibleExpression property)?" for examples of the syntax of conditional expressions.
-
You can now test out/preview your changes by using the Preview (Ctrl+P) button in the top-left of the Document Creator designer. After you are satisfied you can save the file and close the designer, and then import the new version of your layout (stored in the .dcrd design file) in Business Central (see Import Design).
Automatically Generating Totals
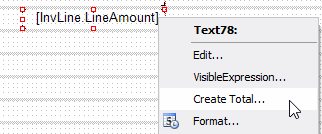
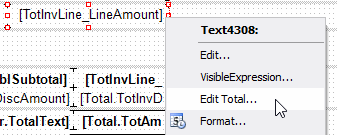
For any TextObject on a Data band that contains a numeric field from your dataset, you can automatically generate a total by right-clicking the TextObject in question, and subsequently selecting the Create Total... option. This will create a new TextObject under your cursor which will contain a newly created total.
Info
Placing the new TextObject on a Footer-band will automatically set the Reset on band property to the last child band of the Footer band, to reset the running value back to 0 each time the band is reached.
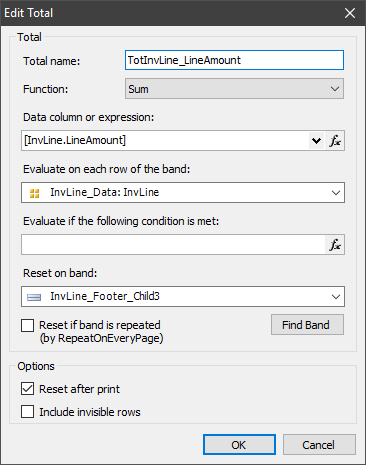
With the new TextObject under your cursor, you can place the TextObject containing the total on a Footer Band (or any other band of your choosing). You can also edit the total by right-clicking the newly created TextObject, and selecting the Edit Total... option, which will open the total editor:
For more information on the parameters of a total, see the documentation on Totals.
Transheader and Transfooter Bands
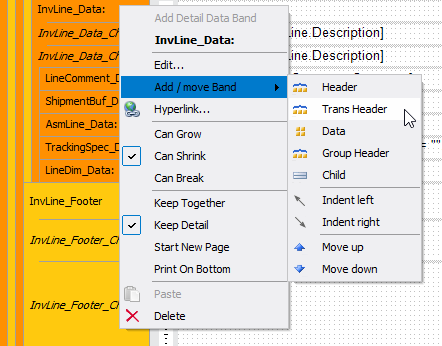
To display transport-totals at the top and/or bottom of a page, you can create Transheader and TransFooter bands. To create a new Transheader-footer pair, right-click on a Data band, and select Add / move Band > Trans Header in the appearing context-menu.
On these bands you can put any earlier-created totals in TextObject controls, whose running value will be shown on the bottom and top of the pages where needed. In the image below an example usage of the Transheader and Transfooter band is shown for a Sales Invoice report layout to show the running value of the total line amount.
Printing Bands on the Page Bottom
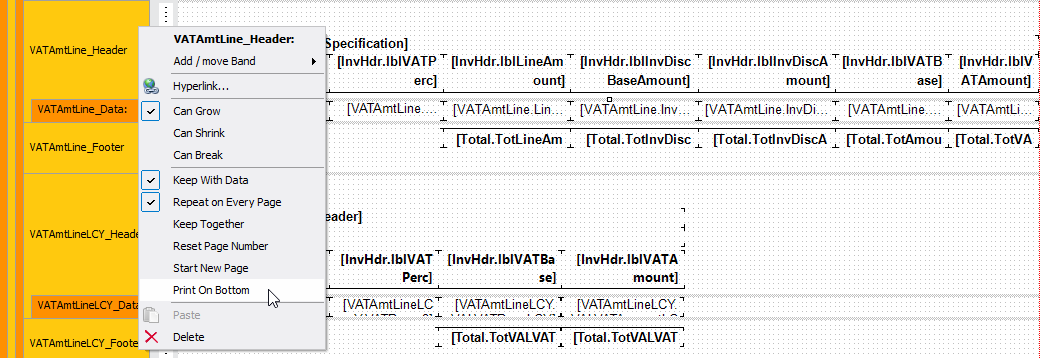
To have one or more bands of your report layout shown always at the bottom of the (last) page, you can use the PrintOnBottom property that is available on bands. For example, if you always want to show the VAT Specification at the bottom of an invoice, you can right-click the first band of the collection of bands to be displayed at the bottom, and select the Print On Bottom option in the appearing context-menu.
Note
Enabling the PrintOnBottom property for a band will also enable the property for any bands that are displayed below. Similarly, disabling the property will disable it for any bands that are displayed above.
Caution
The PrintOnBottom property might not work when used in combination with the RepeatOnEveryPage property on a band. That is, if the band contents do not fit in the remaining free space of the page.
Automatic Text Line Height
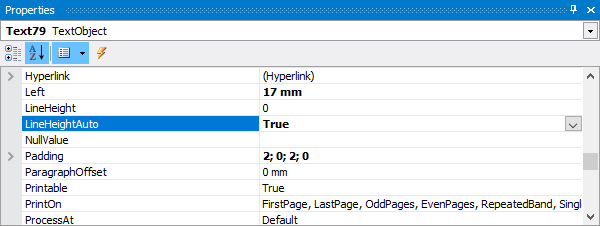
In a report layout a TextObject control may contain multiple lines of text. To change the height of a single line of text in a TextObject, you can use the LineHeight property. The default value of this property is 0, which means that the line height will be the same as that of the font used. To make the line height equal to the height of the TextObject you can set the LineHeightAuto property to True.
Info
When you add a new TextObject control to your layout, its LineHeightAuto property is automatically set to true.
Switching between Basic and All Properties
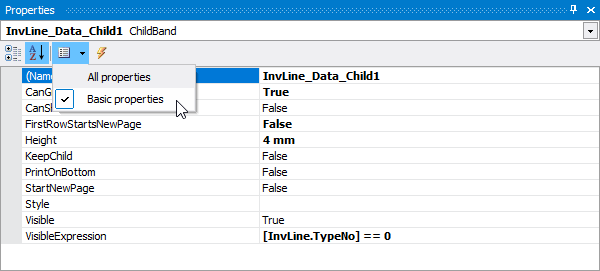
In the property grid, you have the option to switch between showing Basic Properties and All Properties. Selecting the Basic Properties will show you the most common properties and the properties whose values are different from the default value for the selected object.
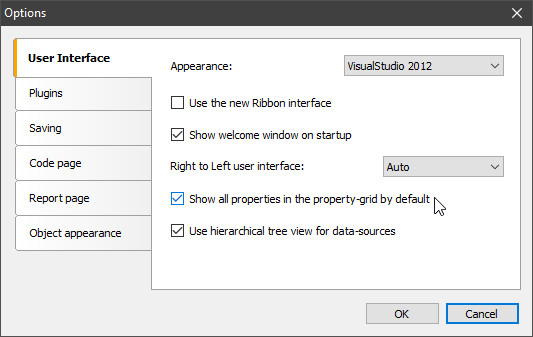
You can change the default value of the setting by navigating to View > Options... > User Interface, which will open the View Options menu. In this menu you can enable or disable the "Show all properties in the property-grid by default" setting to change the default filtering of the property grid.
The Basic Properties consist of the following properties:
| Basic Properties | ||||
|---|---|---|---|---|
| Barcode | Filter | Left | RowCount | Style |
| BottomMargin | Font | LeftMargin | RowSpan | Text |
| CanGrow | Format | LineHeightAuto | SegmentCount | TextAlign |
| CanShrink | GroupBy | MaxHeight | SegmentHeight | Top |
| CheckedSymbol | Height | MaxWidth | SegmentWidth | TopMargin |
| ChildDataSource | HideIfNoData | Name | Shape | TotalType |
| ColSpan | HideIfUnchecked | NoDataText | ShowErrorImage | VertAlign |
| ColumnCount | HideValue | PaperHeight | ShowGrid | Visible |
| Condition | HideZeros | PaperWidth | ShowMarkers | VisibleExpression |
| DataColumn | HorzAlign | ParentDataSource | ShowText | Width |
| DataSource | IncludeInvisibleRows | PrintOnBottom | SizeMode | WordWrap |
| DataType | KeepChild | RepeatOnEveryPage | SortBy | WordWrapType |
| Duplicates | KeepTogether | ResetAfterPrint | SortOrder | Wysiwyg |
| Evaluator | KeepWithData | ResetPageNumber | Spacing | |
| Expression | Landscape | RightMargin | StartNewPage |
View (and Edit) Data
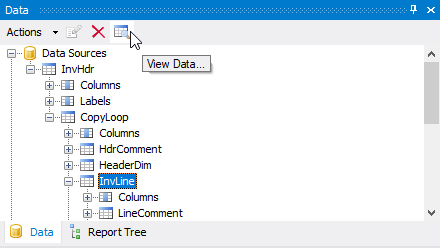
It is possible to view the data that will be used in previews generated from the designer. You can view the data by selecting one of the Data Sources and then invoking the View Data... option.
In the window that opens you can view the data of each record in the Data Source and even edit it by leaving a cell after changing its contents.
Info
Any changes you make to the data in the View Data window only changes the data used in the currently opened designer. Changes you have made to the data from this window in the designer will neither be saved to the Design file nor to Dynamics 365 Business Central.
Advanced HTML Rendering
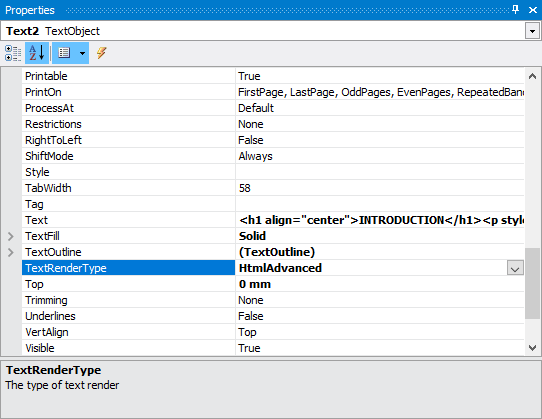
The support for HTML in the TextObject has considerably been extended in the Document Creator Report Designer. You can enable Advanced HTML rendering by setting the TextRenderType property of a TextObject to HtmlAdvanced.
The extended functionalities comprise a larger set of HTML tags being supported, such as paragraphs, divisions, headers and lists, and support for the most-used CSS style attributes, which can be embedded in the supported HTML tags.
Supported HTML Tags
The table below presents a complete overview of the tags supported by the advanced renderer:
| Tag | Description | Supported Attributes |
|---|---|---|
<p>...</p> |
Paragraph with a default bottom-margin of 1 em and top-margin of 0. | align – left, right, center, justifystyle – (see below) |
<div>...</div> |
Division/Section without any default margins or paddings. | align – left, right, center, justifystyle – (see below) |
<h1>...</h1>... <h6>...</h6> |
Headings with default font-size of 2 em, 1.5 em, 1.17 em, 1 em, 0.83 em and 0.67 em respectively. | align – left, right, center, justifystyle – (see below) |
<ol>...</ol> |
Ordered lists, default bottom margin of 1 em and left-padding of 40 px. | type – 1, A, astart – [integer]style – (see below) |
<ul>...</ul> |
Unordered lists, default bottom margin of 1 em and left-padding of 40 px. | type – disc, circle, squarestyle – (see below) |
<li>...</li> |
List item. | style – (see below) |
<span>...</span> |
Span (group of in-line elements). | style – (see below) |
<font>...</font> |
Group of in-line elements with custom font face, color and size. | color – [name]/#xxxxxxface – [font_family]size – [dimension]style – (see below) |
<br>, <br /> |
Line break. | - |
<img> |
Image. | src="...;base64,..."alt – [text] |
<body>...</body> |
Container with default margin of 8 px. | style – (see below) |
<b>...</b><strong>...</strong> |
Bold text. | style – (see below) |
<i>...</i><em>...</em> |
Cursive text. | style – (see below) |
<u>...</u> |
Underlined text. | style – (see below) |
<s>...</s><strike>...</strike> |
Strikeout text. | style – (see below) |
<sub>...</sub> |
Subscript. | style – (see below) |
<sup>...</sup> |
Superscript. | style – (see below) |
Other HTML tags will be ignored; the contents will be shown while the surrounding tags are hidden. The supported tags will be rendered with default margin and padding as defined by the standards, unless stated otherwise in the table above. If an attribute is specified more than once in a tag, the last specification will be applied by the renderer.
Supported CSS Style Attributes
The following CSS style attributes are supported by the renderer:
| Attribute | Description | Supported for Tags |
|---|---|---|
text-align |
Text-alignment of the underlying paragraph. If both the align and text-align CSS attribute are defined, the CSS attribute has higher precedence. | p, div, h#, li |
text-indent |
Indent of the first line of a paragraph. | p, div, h#, li |
font-family |
Font face of the underlying text. | "all" |
font-size |
Font size of the underlying text. | "all" |
color |
Font color of the underlying text, allows one to either specify a color name or hexadecimal code. | "all" |
paddingpadding-bottompadding-toppadding-rightpadding-left |
Padding of the container or paragraph. | p, div, h#, li, ul, ol, body |
marginmargin-bottommargin-topmargin-rightmargin-left |
Margin of the container or paragraph, treated the same as padding. | p, div, h#, li, ul, ol, body |
font-weight |
Font-weight of the underlying text, restricted to the following options: bold, normal, initial |
"all" |
Example
The following example shows some of the capabilities of the extended HTML renderer.
| HTML: Sample snippet that is supported by the advanced renderer | |
|---|---|
1 2 3 4 5 6 7 8 9 10 11 12 13 14 15 | |
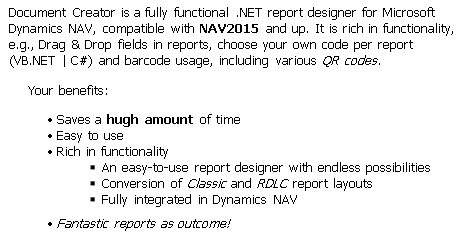
The above will produce the following output in a TextObject with Advanced HTML rendering enabled:
